ESLint, Stylelint 設定
ESLint 是一個 JavaScript 的 Linter, 用來檢查程式碼是否符合規範, 這邊記錄一下如何在 turborepo 及 pnpm 專案下針對 vite 搭配 ReactJs 設定 ESLint + Stylelint
Lint 的主要目標包含:
- ts, tsx, js, jsx check
- css, scss check
- tailwindcss check
- styled-components check
記錄當下的版本
| Version | |
|---|---|
| Node | v20+ |
| Pnpm | v9+ |
| Eslint | 8.57.0 |
| Stylelint | 16+ |
建立 Eslint + Stylelint 設定
-
在
packages/底下分別建立設定 eslint 及 stylelint 的 repocd packages/
mkdir "config-eslint"
mkdir "config-stylelint"底下結構
config-eslint
│
└── package.json
config-stylelint
│
└── package.json -
在
root,config-eslint及config-stylelint安裝 eslint 相關套件pnpm add -D eslint stylelint
pnpm add -D @typescript-eslint/eslint-plugin @typescript-eslint/parser eslint eslint-config-prettier eslint-import-resolver-typescript eslint-plugin-import eslint-plugin-jsx-a11y eslint-plugin-prettier eslint-plugin-react-hooks eslint-plugin-react-refresh eslint-plugin-simple-import-sort typescript-eslint --filter @repo/eslint-config
pnpm add -D postcss-styled-syntax stylelint-config-prettier-scss stylelint-config-standard stylelint-config-standard-scss --filter @repo/stylelint-config -
在
config-eslint/新增對應的設定檔 vite.js:eslint v9 是 breaking change, 準備棄用
.eslintrc格式, 但剛升不久很多設定問題待解決, 所以先繼續維持在 v8vite.jsconst { resolve } = require('node:path');
const projects = ['apps/vite-demo'].map(dir => resolve(process.cwd(), dir, 'tsconfig.json'));
module.exports = {
env: { browser: true, es2024: true },
extends: [
'eslint:recommended',
'plugin:prettier/recommended',
'plugin:@typescript-eslint/recommended',
'plugin:import/recommended',
'plugin:jsx-a11y/recommended',
'plugin:react-hooks/recommended'
],
parser: '@typescript-eslint/parser', // 因為專案使用 ts, 指定使用 typescript-eslint-parser 來解析 code
parserOptions: {
project: projects // 告訴對應的 tsconfig.json 位置
},
plugins: ['jsx-a11y', 'react-refresh', '@typescript-eslint/eslint-plugin', 'simple-import-sort'],
settings: {
// 設定各種 plugin 的解析器和解析所需的選項, 跟上面的 parser 差不多, 就是指定使用 TypeScript 來解析, 並且設定要解析的副檔名
'import/resolver': {
typescript: {
project: projects
},
node: {
extensions: ['.js', '.jsx', '.ts', '.tsx']
}
},
'import/parsers': {
'@typescript-eslint/parser': ['.ts', '.tsx']
}
},
ignorePatterns: ['node_modules/', 'dist/', '.eslintrc.js'],
rules: {
'react-refresh/only-export-components': ['warn', { allowConstantExport: true }],
'@typescript-eslint/no-explicit-any': 'off',
'@typescript-eslint/interface-name-prefix': 'off',
'@typescript-eslint/explicit-function-return-type': 'off',
'@typescript-eslint/explicit-module-boundary-types': 'off',
'simple-import-sort/imports': 'error',
'simple-import-sort/exports': 'error',
'import/first': 'error',
'import/named': 'off',
'import/newline-after-import': 'error',
'import/no-duplicates': 'error',
'import/no-named-as-default': 'off',
'import/no-default-export': 'off'
}
}; -
在
config-stylelint/新增對應的設定檔 stylelint.config.js, .stylelintignorestyled-components 檢查的位置是在 .tsx/.jsx 等非
.css內, 所以使用postcss-styled-syntax另外設定在 overrides 中stylelint.config.jsmodule.exports = {
extends: ['stylelint-config-standard', 'stylelint-config-standard-scss', 'stylelint-config-prettier-scss'],
rules: {
'no-descending-specificity': true,
'declaration-block-no-duplicate-custom-properties': true,
'declaration-block-no-duplicate-properties': true,
'font-family-no-duplicate-names': true,
'no-duplicate-selectors': true,
'block-no-empty': true,
'no-empty-source': true,
'string-no-newline': true,
'no-irregular-whitespace': true,
'declaration-block-no-shorthand-property-overrides': true,
'declaration-block-no-redundant-longhand-properties': true,
'shorthand-property-no-redundant-values': true,
// 下面兩個是用來忽略 tailwindcss 的 @apply 規則
'at-rule-no-unknown': null,
'scss/at-rule-no-unknown': [
true,
{
ignoreAtRules: ['tailwind']
}
]
},
// 設定 styled-components 的檢查
overrides: [
{
files: ['**/*.tsx', '**/*.jsx'],
customSyntax: 'postcss-styled-syntax',
rules: {
'no-descending-specificity': true,
'declaration-block-no-duplicate-properties': true
}
}
]
};
建立 vite + react
- 新增一個 test 用的 vite repo
vite-demo(這邊使用 ts template), 並新增需要的 library在cd apps/
pnpm create vite vite-demo --template react-ts
pnpm add styled-componentspackage.json的deps中新增剛剛建立的兩個 repo (library name 就是 repo 中 package.json 設定的 name)"devDependencies": {
"@repo/eslint-config": "workspace:^",
"@repo/stylelint-config": "workspace:^",
}vite-demo
│
├───src
├───.eslintrc.cjs
├───tsconfig.json
├───vite.config.ts
│
└── package.json - 更改原本的
.eslintrc.cjs, 去接上 repo 的設定.eslintrc.cjsmodule.exports = {
extends: ['@repo/eslint-config/vite.js'],
parserOptions: {
project: 'tsconfig.json'
}
}; - vite-demo 新增
.stylelintrc.cjs, 去接上 repo 的設定:.stylelintrc.cjsmodule.exports = {
extends: ['@repo/stylelint-config/stylelint.config.js'],
ignoreFiles: ['**/dist/**/*', '**/public/**/*', '**/build/**/*', '**/*.config.{js,ts}']
};
建立 Typescript 設定
- 新增一個
config-typescript來管理共用的 tsconfig.json,@repo/typescript-config
├───vite.json
└── package.jsonvite.json{
"$schema": "https://json.schemastore.org/tsconfig",
"display": "Vite",
"compilerOptions": {
"target": "ES2020",
"useDefineForClassFields": true,
"lib": ["ES2020", "DOM", "DOM.Iterable"],
"module": "ESNext",
"skipLibCheck": true,
"moduleResolution": "bundler",
"allowImportingTsExtensions": true,
"resolveJsonModule": true,
"isolatedModules": true,
"noEmit": true,
"jsx": "react-jsx",
"strict": true,
"noUnusedLocals": true,
"noUnusedParameters": true,
"noFallthroughCasesInSwitch": true,
"sourceMap": false,
"baseUrl": "./",
"paths": {
"@/*": ["./src/*"]
}
},
"include": ["src"],
"references": [{ "path": "./tsconfig.node.json" }]
} - 因為想要使用 path alias, 所以同時修改
vite.config.tsvite.config.tsimport path from 'node:path';
import react from '@vitejs/plugin-react';
import { defineConfig } from 'vite';
export default defineConfig({
resolve: {
alias: {
'@': path.resolve(__dirname, './src')
}
},
plugins: [react()]
}); - 然後更新原本的
tsconfig.json, 去接上 repo 的設定tsconfig.json{
"extends": "@repo/typescript-config/vite.json",
"compilerOptions": {
"plugins": [{ "name": "vite" }],
"baseUrl": "./",
"paths": {
"@/*": ["./src/*"]
},
"outDir": "./dist"
},
"include": ["**/*.ts", "**/*.tsx"],
"exclude": ["node_modules"]
}
建立 Tailwind CSS 設定
25/02/15 updated: upgrade tailwindcss from v3 to v4
-
新增一個
config-tailwind來管理共用的 tailwind csspnpm add -D tailwindcss @tailwindcss/postcss postcss --filter @repo/tailwind-config@repo/typescript-config
├───postcss.config.mjs
└── package.jsonpostcss.config.mjsexport default {
plugins: {
'@tailwindcss/postcss': {}
}
};tailwind.config.js 在 v4 可以不需要了
-
然後更新原本的
postcss.config.mjs去接上 repo 的設定postcss.config.mjspostcss.config.mjsimport config from '@repo/tailwind-config/postcss.config';
export default config; -
原本的 repo root �的
index.css也記得設定:剛剛說的 v4 可以直接將設定寫入, 像是將原本的 color 設定直接設定在
@theme或@layer中index.css@import 'tailwindcss';
@theme {
--color-primary-blue: #00a2d4;
--color-primary: #5e20dd;
--color-basic-100: #2b303b;
--color-basic-content: #f2f5f9;
--color-primary-focus: #4b1ab1;
--color-basic-content-70: #b6bac0;
--color-basic-content-50: #8e929a;
--color-basic-content-20: #535761;
--color-basic-content-10: #3f444e;
--color-basic-content-5: #353a44;
--color-success: #1e997b;
--color-error: #e33e37;
--color-mask: rgb(0 0 0 / 60%);
--font-sans: ui-sans-serif, system-ui, sans-serif, 'Apple Color Emoji', 'Segoe UI Emoji', 'Segoe UI Symbol', 'Noto Color Emoji';
--font-serif: ui-serif, georgia, cambria, 'Times New Roman', times, serif;
--font-mono: ui-monospace, sfmono-regular, menlo, monaco, consolas, 'Liberation Mono', 'Courier New', monospace;
}
@layer base {
h1 {
font-size: var(--text-2xl);
}
h2 {
font-size: var(--text-xl);
}
h3 {
font-size: var(--text-lg);
}
}其他詳細可以參考 Tailwind CSS
調整 package.json
-
在
vite-demo的package.json中加上 script, 現在 vite-demo 的package.json應該會長這樣:package.json{
"name": "vite-demo",
"private": true,
"version": "0.0.0",
"type": "module",
"scripts": {
"dev": "vite",
"build": "tsc && vite build",
"preview": "vite preview",
"lint": "eslint . --fix",
"lint:css": "stylelint \"**/*.{js,jsx,ts,tsx,css,scss}\" --fix"
},
"dependencies": {
"react": "^18.3.1",
"react-dom": "^18.3.1",
"styled-components": "^6.1.8"
},
"devDependencies": {
"@repo/eslint-config": "workspace:^",
"@repo/stylelint-config": "workspace:^",
"@repo/tailwind-config": "workspace:^",
"@repo/typescript-config": "workspace:^",
"@types/react": "^18.3.1",
"@types/react-dom": "^18.3.0",
"@typescript-eslint/eslint-plugin": "^7.2.0",
"@vitejs/plugin-react": "^4.2.1",
"typescript": "^5.4.5",
"vite": "^5.2.10"
}
}原本 create vite 的 template 有一些 lint 相關的可以省略改吃 repo 那邊的 library, 且加上去的四個 repo library 記得要再
pnpm install確保有更新至該 project 的 node_modules 內
-
最後在
root的 package.json 加上對應的 script:{
"scripts": {
"lint": "turbo lint --filter vite-demo",
"lint:css": "turbo lint:css --filter vite-demo"
}
}--filter只是用於測試上先 focus 在該專案而已, 可自行再調整然後在 turbo.json 中設定對應的 script:
{
  "pipeline": {
    "lint": {
      "cache": false
    },
    "lint:css": {
      "cache": false
    }
  }
}cache看個人, 最後就可以執行pnpm run lint或pnpm run lint:css來檢查程式碼是否符合規範:
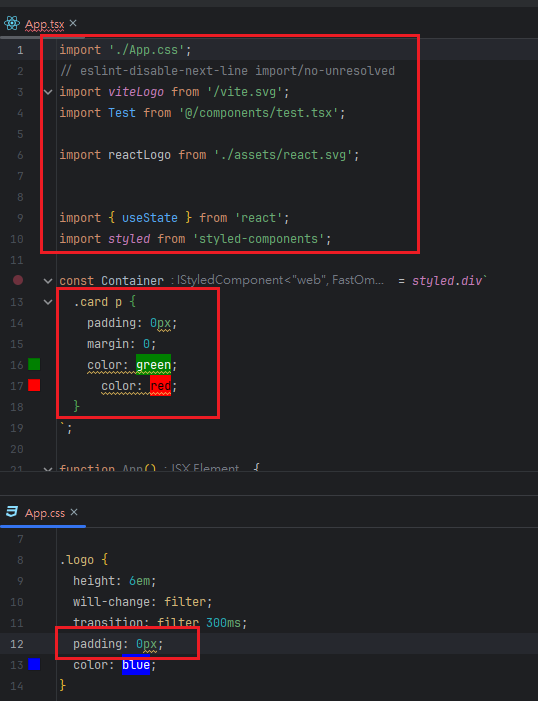
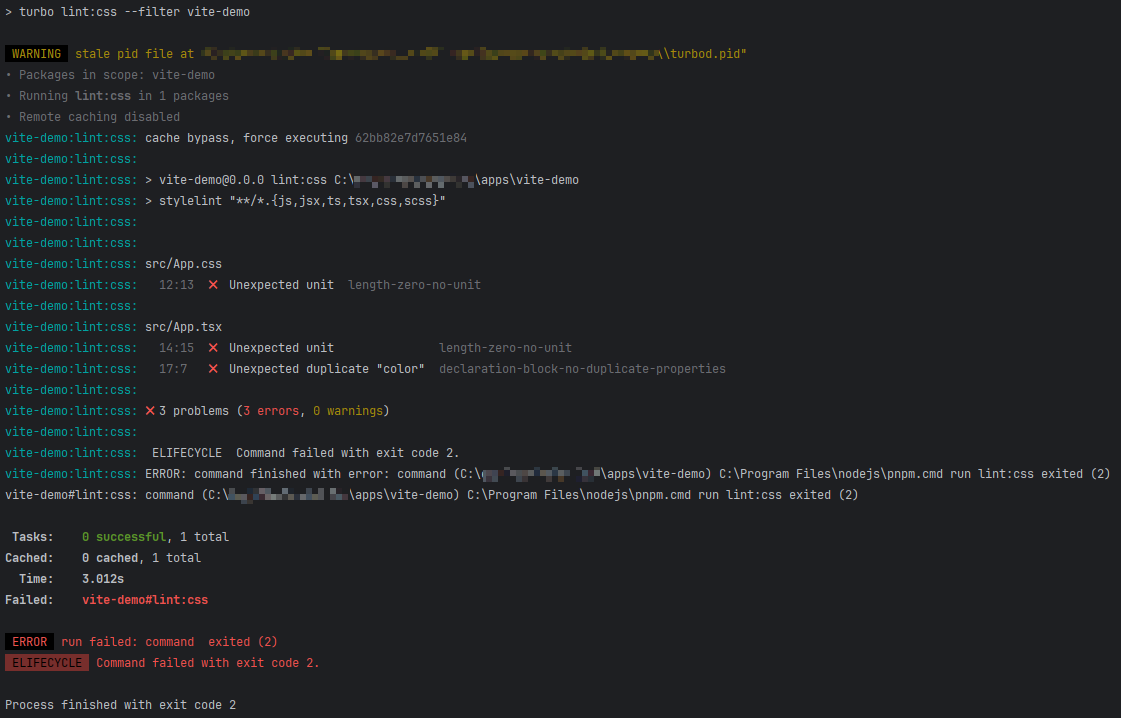
在 App.tsx, App.css 隨便調整幾個不符合規則的 code
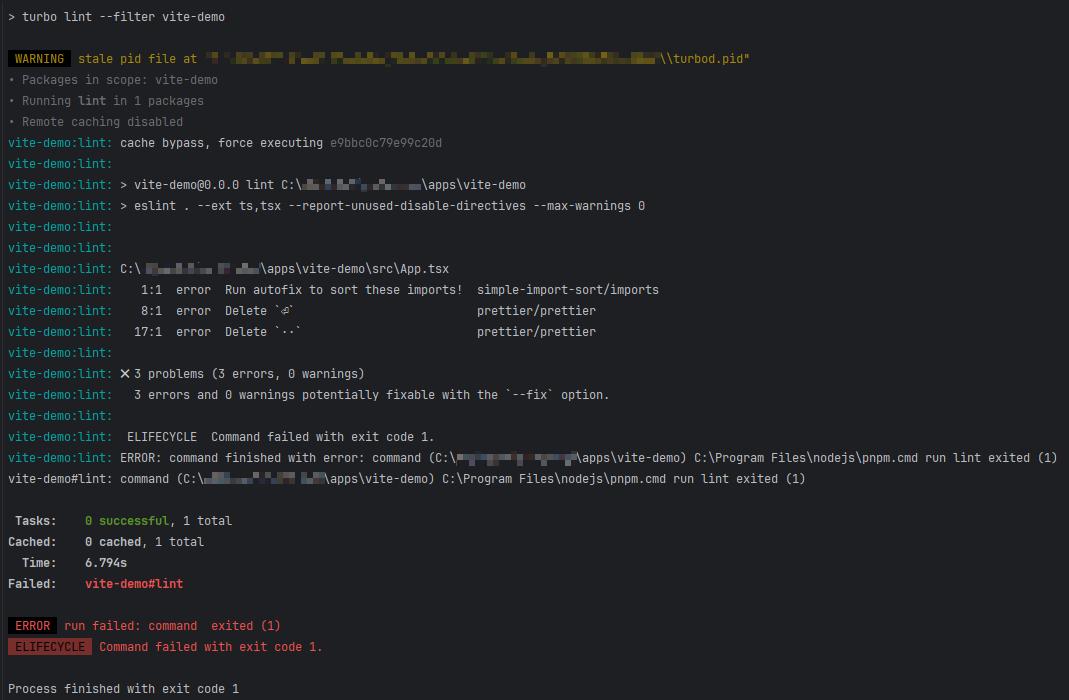
然後執行 turbo script
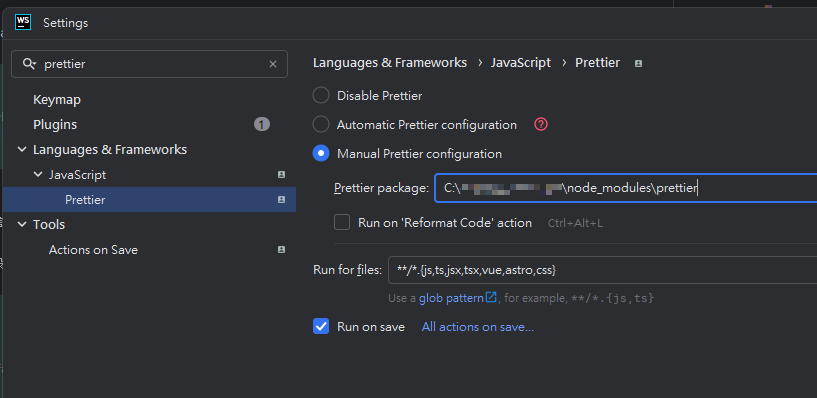
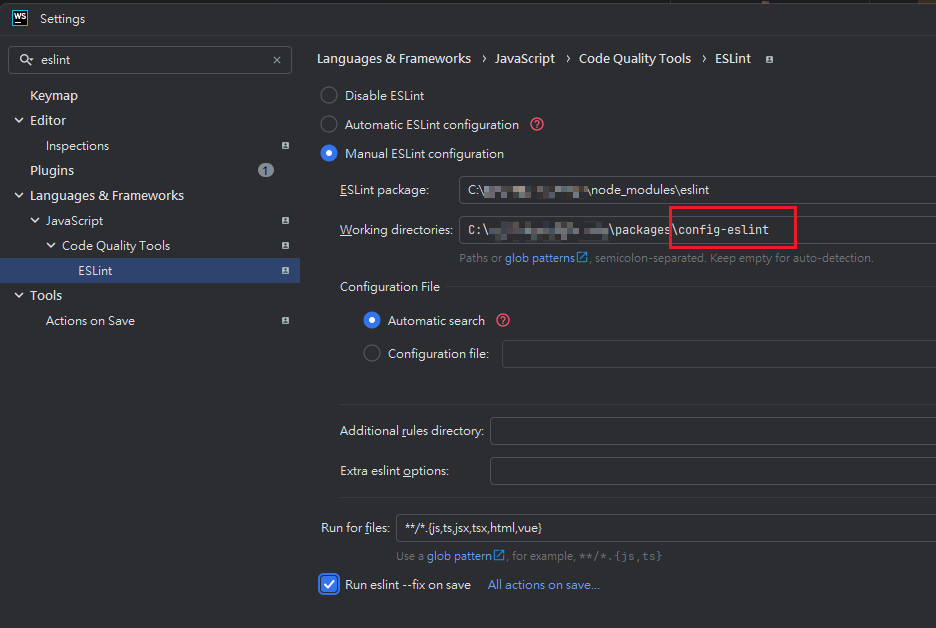
如果是使用 jetBrains 的 WebStorm, 可以在設定中加上 ESLint 及 Stylelint 的設定, 這樣在編輯時就會有提示也可以自動修正