Line Bot Message API with Audio x OpenAI Whisper
這邊主要記錄如何透過 Line Bot Message API 來接收音訊檔案, 並藉由 OpenAI 的 Whisper 來處理音訊檔案, 最終回傳轉換後的文字訊息
建立 Line Bot
-
先到 Line Developers 建立一個 Provider
-
在 Provider 中建立一個 Messaging API Channel, 這邊會要求建立對應的 LINE Official Account (前面沒有建立 Provider 的話也可以這邊建立, 或者選擇已有的, 然後認證帳號的部分可以先跳過不影響)
-
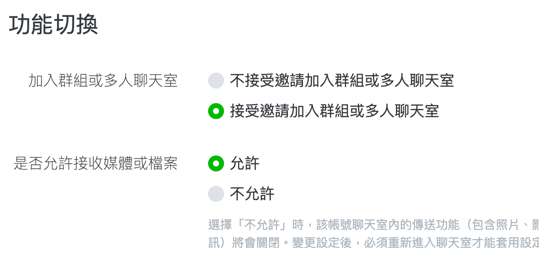
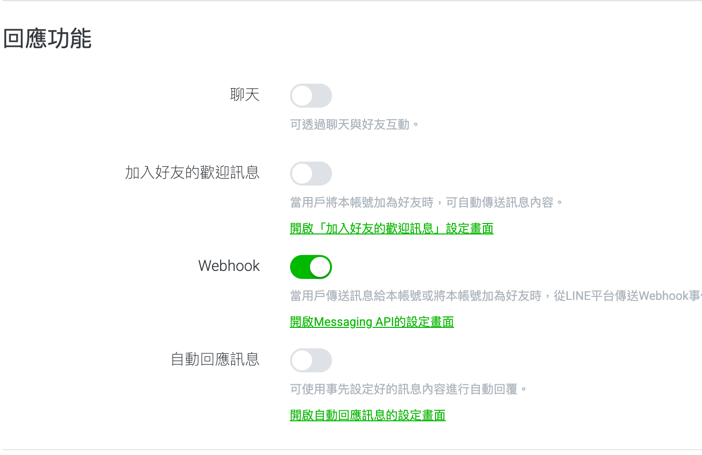
建立後可以先點右上方的設定調整一些需求, 例如帳號設定中的功能切換可以決定是否接受邀請至群組及聊天室, 以及回應設定中的回應功能也可以自行調整 (Webhook 的部分需要等我們設定 Webhook URL 後才能開啟)
-
設定好後在 Line Developers 的 Messaging API Channel 中可以取得 Channel Access Token
-
記得將 Bot 加入到對應的群組或聊天室中, 這樣待會才能接收訊息
在專案上建立對應的 Line Utility
安裝相關套件
pnpm add @line/bot-sdk --filter=YOUR_APPS
先設定對應的 config, constants
export const lineConfigFactory = registerAs('line', () => {
  return {
    botChannelAccessToken: process.env.LINE_BOT_CHANNEL_ACCESS_TOKEN
  };
});
LINE_BOT_CHANNEL_ACCESS_TOKEN 是剛剛在 Line Developers Message API 中取得的 Channel Access Token, 記得設定在 .env 中
export function loadConfigImports() {
  // ...
  return [
    ConfigModule.forRoot({
      envFilePath: ['.env', '.env.development', '.env.staging', '.env.production'],
      isGlobal: true,
      load: [
        // ...
        lineConfigFactory
      ],
      expandVariables: true // Enable environment variable expansion
    })
    // ...
  ];
}
const lineBotExceptions = {
  PARSE_AUDIO_FAILED: {
    code: 'PARSE_AUDIO_FAILED',
    message: 'Failed to parse audio',
    origin: 'main',
    statusCode: 500
  }
  // ...
};
export default lineBotExceptions;
建立 Line Bot Utility
import * as querystring from 'node:querystring';
import { Readable } from 'node:stream';
import { EventSource, messagingApi, WebhookEvent } from '@line/bot-sdk';
import { Injectable } from '@nestjs/common';
import { ConfigService } from '@nestjs/config';
// ...
const { MessagingApiClient } = messagingApi;

@Injectable()
export class LineBotUtility {
  private channelAccessToken: string;
  private lineClient: messagingApi.MessagingApiClient;
  constructor(private configService: ConfigService) {
    this.channelAccessToken = this.configService.get<string>('line.botChannelAccessToken');

    this.lineClient = new MessagingApiClient({
      channelAccessToken: this.channelAccessToken
    });
  }

  public async handleLineEvents(events: WebhookEvent[]): Promise<any[]> {
    return Promise.all(
      events.map(async (event: WebhookEvent) => {
        const source: EventSource = event.source;
        this.logger.debug(`receive line event: ${JSON.stringify(event)}`);
        this.logger.debug(`event source: ${JSON.stringify(source)}`);

        switch (event.type) {
          // ...
          case 'message': {
            // 這邊可以處理從 Line 傳進來的訊息
            const message = event.message;
            if (message.type === 'text') {
              const userText = message.text;
              await this.lineClient.replyMessage({
                replyToken,
                messages: [
                  {
                    type: 'text',
                    text: `你說了:${userText}`
                  }
                ]
              });
            }
            return;
          }
          default:
            return;
        }
      })
    );
  }
}
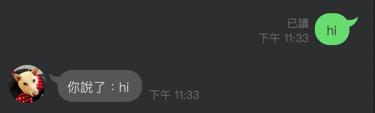
上面在 message type 為 text 的時候先回覆傳入的文字訊息, 這時候我們可以先建立 Service, Controller, Module 來測試
建立 Service, Controller, Module
// ...
@Injectable()
export class LineBotService {
  constructor(private lineBotUtility: LineBotUtility) {}

  async handleLineBotWebhook(events: WebhookEvent[]) {
    return this.lineBotUtility.handleLineEvents(events);
  }
}
// ...
@Controller('line-bot')
export class LineBotController {
  constructor(private readonly lineBotService: LineBotService) {}

  @Post('webhook')
  async handleLineBotWebhook(@Body() _body: { destination: string; events: WebhookEvent[] }) {
    const { events } = _body;
    return this.lineBotService.handleLineBotWebhook(events);
  }
}
// ...
@Module({
  imports: [],
  controllers: [LineBotController],
  providers: [LineBotService, LineBotUtility]
})
export class LineBotModule {}
然後將 LineBotModule import 至 App Module 中
建立 Webhook URL
我們可以使用 ngrok 來建立一個可以讓外部存取的 URL, 方便我們在開發的時候可以讓 Line Bot 送訊息過來做測試
ngrok http NUMBER // NUMBER 為你的 server port
然後將這個 URL 設定到 Line Developers 的 Messaging API Channel 中的 Webhook URL (url 後面的 endpoint 記得要設定到對應的 controller)
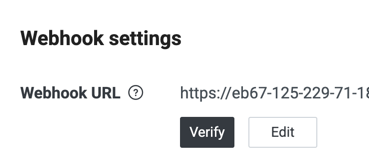
驗證成功後就可以傳送一般訊息來測試
串接 OpenAI Whisper
- 先至 OpenAI 註冊帳號, 並且建立一把 API Key
安裝相關套件
pnpm add openai --filter=YOUR_APPS
先設定對應的 config, constants
export const aiConfigFactory = registerAs('ai', () => {
  return {
    openaiApiKey: process.env.OPENAI_API_KEY
  };
});
OPENAI_API_KEY 是剛剛在 OpenAI 中建立的 API Key, 記得設定在 .env 中
export function loadConfigImports() {
  // ...
  return [
    ConfigModule.forRoot({
      envFilePath: ['.env', '.env.development', '.env.staging', '.env.production'],
      isGlobal: true,
      load: [
        // ...
        aiConfigFactory
      ],
      expandVariables: true // Enable environment variable expansion
    })
    // ...
  ];
}
const openaiExceptions = {
  WHISPER_TRANSCRIPTION_FAILED: {
    code: 'WHISPER_TRANSCRIPTION_FAILED',
    message: 'Whisper failed to transcribe audio',
    origin: 'main',
    statusCode: 500
  }
};
export default openaiExceptions;
建立 OpenAI Utility 並透過 whisper-1 model 來處理 Audio
import fs from 'node:fs';
import * as path from 'node:path';
import { Injectable } from '@nestjs/common';
import { ConfigService } from '@nestjs/config';
import { OpenAI } from 'openai';
// ...
@Injectable()
export class OpenaiUtility {
  private openai: OpenAI;
  constructor(
    private configService: ConfigService,
    private exceptionUtility: ExceptionUtility
  ) {
    const openaiApiKey = this.configService.get<string>('openaiApiKey');
    this.openai = new OpenAI({
      apiKey: openaiApiKey
    });
  }

  /**
   * Transcribe audio using OpenAI's Whisper model
   */
  public async transcribeAudioViaFile(audioBuffer: Buffer): Promise<string> {
    try {
      const tmpFile = path.join(process.cwd(), 'temp_audio.m4a');
      fs.writeFileSync(tmpFile, audioBuffer);

      const transcription = await this.openai.audio.transcriptions.create({
        file: fs.createReadStream(tmpFile),
        model: 'whisper-1'
      });

      fs.unlinkSync(tmpFile);

      return transcription.text;
    } catch (error: unknown) {
      this.exceptionUtility.handleCatchErrorHelper({
        error,
        logMessage: '[transcribeAudioViaFile] failed',
        customError: { ...openaiExceptions.WHISPER_TRANSCRIPTION_FAILED },
        enableThrow: true
      });
    }
  }
}
調整 Line Bot Utility 並接上 Openai
原本 Line bot 提供的 Client 已經被設定為棄用
/**
 * @deprecated Use clients generated by openapi spec instead.
 */
export default class Client {}
所以這邊已經改為使用 messagingApi.MessagingApiClient 來處理, 但 MessagingApiClient 並沒有提供原本的 getMessageContent 方法, 所以這邊另外實作 getMessageContent 方法
import { Injectable } from '@nestjs/common';
import { Readable } from 'stream';
import { HttpRequestUtility } from '@/core/utils/http-request.utility';

@Injectable()
export class ExtendedMessagingApiClientUtility {
  private readonly dataApiPrefix = 'https://api-data.line.me/v2/bot';

  constructor(private readonly httpRequestUtility: HttpRequestUtility) {}

  public async getMessageContent(messageId: string, channelAccessToken: string): Promise<Readable> {
    const url = `${this.dataApiPrefix}/message/${messageId}/content`;

    const readStream: Readable = await this.httpRequestUtility.sendRequest({
      url,
      method: 'GET',
      responseType: 'stream',
      options: {
        headers: {
          Authorization: `Bearer ${channelAccessToken}`
        }
      }
    });
    return readStream;
  }
}
httpRequestUtility 是搭配 @nestjs/axios 來處理 http request 的 utility (可以改成其他 fetch 方式)
import { HttpService } from '@nestjs/axios';
import { Injectable } from '@nestjs/common';
import { AxiosError, AxiosRequestConfig, Method } from 'axios';
import { Request as ExpressRequest } from 'express';
import { catchError, firstValueFrom } from 'rxjs';
//...
@Injectable()
export class HttpRequestUtility {
  constructor(private readonly httpService: HttpService) {}

  public async sendRequest({
    url,
    method,
    options = {
      headers: {
        'Content-Type': 'application/json'
      }
    },
    responseType = 'json'
  }: {
    url: string;
    method: Method;
    options?: {
      data?: any;
      headers?: Record<string, string>;
      req?: ExpressRequest;
      cancelable?: boolean;
    };
    responseType?: AxiosRequestConfig['responseType'];
  }): Promise<any> {
    const config: AxiosRequestConfig = {
      method,
      url,
      responseType,
      headers: {
        ...options.headers
      },
      validateStatus: status => status >= 200 && status < 300
    };

    if (options?.data) {
      config.data = options.data;
    }

    if (options?.req && options.cancelable) {
      const controller = new AbortController();

      options.req.on('close', () => {
        controller.abort();
      });

      config.signal = controller.signal;
    }

    const response = await firstValueFrom(
      this.httpService.request(config).pipe(
        catchError((error: AxiosError) => {
          throw error;
        })
      )
    );

    if (!response || response?.data === null || response?.data === undefined) {
      throw throwValidationError(serverException.INTERNAL_SERVER_ERROR);
    }

    return response.data;
  }
}
然後在 LineBotUtility 中使用這個方法來取得音訊檔案
// ...
switch (message.type) {
case 'audio':
try {
const contentStream: Readable = await this.extendedMessagingApiClientUtility.getMessageContent(message.id, this.channelAccessToken);
const chunks: Buffer[] = [];
for await (const chunk of contentStream as AsyncIterable<Buffer>) {
chunks.push(chunk);
}
const audioBuffer = Buffer.concat(chunks);
// call OpenAI Whisper to transcribe audio
const textResult = await this.openaiUtility.transcribeAudioViaFile(audioBuffer);
await this.lineClient.replyMessage({
replyToken,
messages: [
{
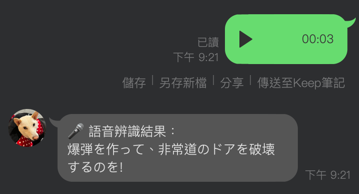
type: 'text',
text: `🎤 語音辨識結果:\n${textResult}`
}
]
});
} catch (error: unknown) {
await this.lineClient.replyMessage({
replyToken,
messages: [
{
type: 'text',
text: '語音辨識失敗,請稍後再試或確認檔案格式是否正確。'
}
]
});
this.exceptionUtility.handleCatchErrorHelper({
error,
logMessage: '[handleLineEvents] parsed audio failed',
customError: { ...lineBotExceptions.PARSE_AUDIO_FAILED },
enableThrow: true
});
}
break;
// ...
default:
break;
}
// ...
這樣就可以透過 Line Bot 來串接 OpenAI 的 Whisper 來處理音訊檔案了
轉換完的文字也可以再去做其他處理