(Line) Authentication with Passport
此篇以 line 為例
前置作業
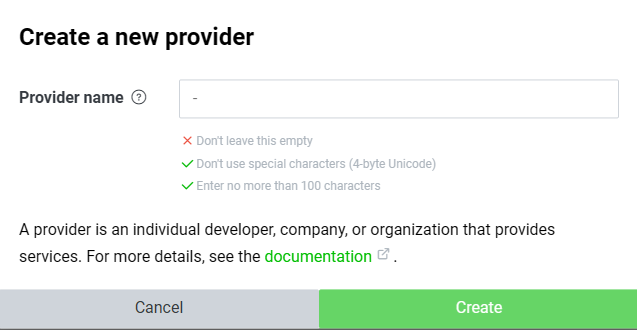
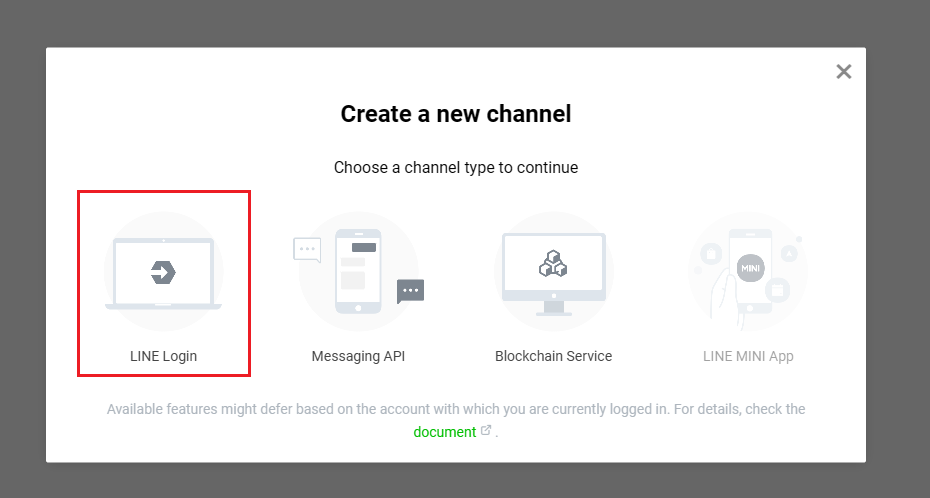
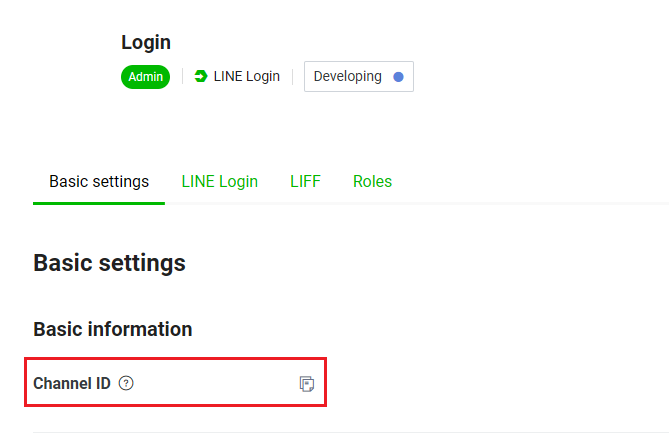
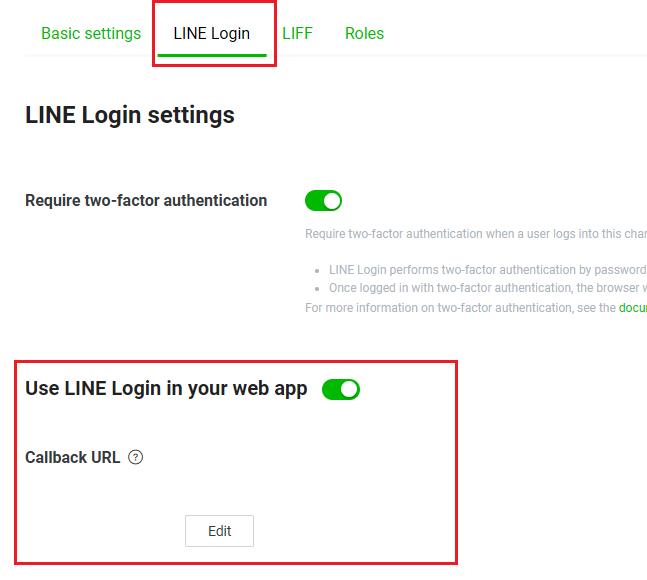
在串接 passport-line 之前, 需要先去 Line Developers 建立一個 Provider, 並建立一個 Line Login 的 Channel, 在使用的 passport-line-auth 套件中, 與 google, facebook 不同的是, 參數為channelID 與 channelSecret, 可以從 LINE Login Channel 的 Basic settings 中取得, 並且在 LINE Login 那邊設定對應的 callback url, 如圖所示, 或可參考 Line 文件

流程部分同 Passport-Google 那篇
建立 Guard 及 Strategy
先安裝所需套件
pnpm add passport-line-auth --filter PACKAGE_NAME
建立 Guard
import { ExecutionContext, Injectable } from '@nestjs/common';
import { AuthGuard } from '@nestjs/passport';
import { PassportUtility } from '@/core/guards/passport/utils/passport.utility';

@Injectable()
export class LineOauthGuard extends AuthGuard('line') {
  constructor(private readonly passportUtility: PassportUtility) {
    super();
  }

  async canActivate(context: ExecutionContext) {
    const result = (await super.canActivate(context)) as boolean;
    const request = context.switchToHttp().getRequest();
    await super.logIn(request);
    return result;
  }

  handleRequest(error: any, user: any, info: any, context: ExecutionContext) {
    return this.passportUtility.handleGuardRequest(error, user, info, context);
  }
}
與 passport-local 相同的部分可以參考 passport-local
其他部分使用方式與 passport-google 相同
建立 Strategy
// ...
type LineRaw = {
  userId: string;
  displayName: string | undefined;
  pictureUrl: string | undefined;
};

@Injectable()
export class LineStrategy extends PassportStrategy(Strategy, 'line', 6) {
  constructor(
    @InjectModel(SESSION_MODEL_TOKEN, dbConnectionName.AUTH)
    private readonly sessionModel: Model<SessionDocument>,
    private readonly cryptUtility: CryptUtility,
    private readonly configService: ConfigService,
    private readonly httpService: HttpService,
    private readonly passportService: PassportService,
    private readonly userService: UserService
  ) {
    super({
      channelID: configService.get<string>('auth.authLineClientID'),
      channelSecret: configService.get<string>('auth.authLineClientSecret'),
      callbackURL: configService.get<string>('auth.authLineCallbackURL'),
      scope: ['openid', 'profile', 'email'],
      passReqToCallback: true
    });
  }

  // pass options to superclass auth call by overriding superclass method that will be passed to authenticate()
  authorizationParams(): { [key: string]: string } {
    return {
      prompt: 'consent',
      initial_amr_display: 'lineqr'
    };
  }

  async validate(req: ExpressRequest, _accessToken: string, _refreshToken: string, params: any, profile: any, done: (err: any, user: any, info?: any) => void): Promise<any> {
    const state = req.query.state;

    // get original query params from session if exists
    const session: SessionDocument = await this.sessionModel.findOne(
      {
        'session.lineState': state
      },
      { 'session.params': 1 }
    );
    if (session.session.params) {
      req.query.sessionParams = JSON.stringify(session.session.params);
    }

    const { id } = profile;
    const _raw: LineRaw = profile._raw;

    // Verify through id_token and get email
    const id_token = params.id_token;
    const { data } = await firstValueFrom(
      this.httpService.post(
        'https://api.line.me/oauth2/v2.1/verify',
        {
          id_token,
          client_id: this.configService.get<string>('auth.authLineClientID')
        },
        {
          headers: {
            'Content-Type': 'application/x-www-form-urlencoded'
          }
        }
      )
    );

    const existedUser = await this.passportService.fetchUserByThirdParty({ target: signupStrategy.LINE, accessToken: _accessToken, id });

    let user: null | Partial<UserDocument>;

    // ...

    done(null, user);
  }
}
如果要取得 user 的 email 資訊, 需要在 LINE Login Channel 的 Basic settings 最下方 apply permission 才可以
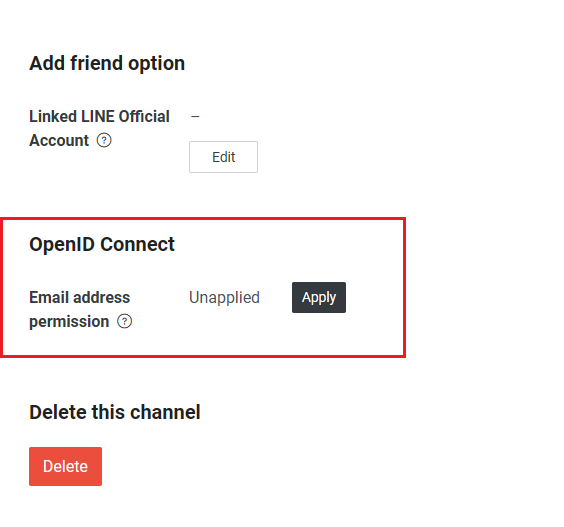
Line 的 email 資訊即便已經有 apply permission, 並且使用者同意提供 email, 也無法直接在驗證成功所回傳的 profile 資料中取得(即使 scope 有設定 email, 預設也不會回傳 email 資料)

而且也不能直接使用 access_token 去詢問是否有 email 的資料, 而是需要使用 id_token 去訪問 Verify ID token API: [POST] https://api.line.me/oauth2/v2.1/verify 才能取得使用者的 email

而 id_token 是在 [POST] https://api.line.me/oauth2/v2.1/token (也就是我們 Strategy 驗證所呼叫的那隻) 的 response 裡面會提供, 這個東西追了一下 source code, 在 node_modules\passport-oauth2\lib\strategy.js 中其實有提供, 在
self._oauth2.getOAuthAccessToken function 中的 self._loadUserProfile function:
try {
  if (self._passReqToCallback) {
    var arity = self._verify.length;
    if (arity == 6) {
      self._verify(req, accessToken, refreshToken, params, profile, verified);
    } else {
      // arity == 5
      self._verify(req, accessToken, refreshToken, profile, verified);
    }
  } else {
    var arity = self._verify.length;
    if (arity == 5) {
      self._verify(accessToken, refreshToken, params, profile, verified);
    } else {
      // arity == 4
      self._verify(accessToken, refreshToken, profile, verified);
    }
  }
} catch (ex) {
  return self.error(ex);
}
其中 response 的資料會放在 params 裡面, 因此如果要拿到 id_token 做後續處理, 在 LineStrategy 中的 arity 參數要設定為 (req, accessToken, refreshToken, params, profile, cb) 6 個參數 (包含需要 passReqToCallback 時), 或設定為 (accessToken, refreshToken, params, profile, cb) 5 個參數, 這樣才能拿到 (他的 arity length 其實就是看你 function 設定的參數有多少個來決定要回多少資料回去), 所以我們需要設定我們的 callbackArity 來取得我們需要的資料:
export class LineStrategy extends PassportStrategy(Strategy, 'line', 6) {}
另外當透過請求 [GET] /google 重定向至 Line 登入頁面時, 這時候會建立一筆 session (session 部分可參考 這篇), 這筆 session 會有一個 state 的 key (oauth2:access.line.me), 這個 key 是用來驗證回傳的資料是否為正確的 (防範 CSRF 攻擊), 這個 state 會在 validate 的時候被使用, 這邊我們將這個 state 存在 session 中, 並在 validate 的時候取出來使用
有關 CSRF 的部分可以參考 Huli 大大的 讓我們來談談 CSRF 文章
[
  {
    "_id": "NwReAUXXMQXWYIqng8GYr_FyekTk7CpM",
    "expires": { "$date": "2024-06-25T08:46:25.744Z" },
    "session": {
      "cookie": {
        "originalMaxAge": 300000,
        "expires": { "$date": "2024-06-25T08:46:25.744Z" },
        "secure": true,
        "domain": "SESSION_DOMAIN",
        "path": "/",
        "sameSite": "lax"
      },
      "oauth2:access.line.me": {
        "state": "ePFDwsITkw3lAe9sGGWLzpsJ"
      }
    }
  }
]
建立 Middleware 自定義 state
上面提到的 state, 我在使用 MongoDB 查詢的時候, 發現沒有傳遞原本存在的 state, 導致驗證失敗, 然後 line 的 key 又很特殊, 在 MongoDB 針對這個有 : + . 的 key 做 search 並沒有辦法正確找到資料, 因此我這邊手動傳遞了自定義的 key
-
首先我們在透過請求
[GET] /line重定向至 Line 登入頁面時, 建立一個AddCustomLineSessionStateMiddleware來將 state 的值取代成我們所給的值, 並且將這個值存入 session 中 (下面的例子就是lineState)line-state.middleware.tsimport { Injectable, NestMiddleware } from '@nestjs/common';
import { InjectModel } from '@nestjs/mongoose';
import { NextFunction, Request, Response } from 'express';
import { Model } from 'mongoose';
import passport from 'passport';
import { dbConnectionName } from '@/common/constants';
import { SESSION_MODEL_TOKEN, SessionDocument } from '@/common/models/cas/session.schema';
import { CryptUtility } from '@/core/utils/crypt.utility';
@Injectable()
export class AddCustomLineSessionStateMiddleware implements NestMiddleware {
constructor(private readonly cryptUtility: CryptUtility) {}
async use(req: Request, res: Response, next: NextFunction) {
// set custom state to replace default state authentication
req.session.lineState = await this.cryptUtility.randomString();
passport.authenticate('line', {
scope: ['openid', 'profile', 'email'],
state: req.session.lineState // change to custom state
})(req, res, next);
next();
}
} -
當透過
[GET] /line/callback返回時, 我們建立一個LineSessionStateCallbackMiddleware, 來確認req.query.state的值是否有存在於我們的 session 中的lineState, 如果有, 代表是來自我們自定義的 state, 這時我們將這個 state 的值回存到oauth2:access.line.me, 讓 line 的驗證機制可以成功通過line-state.middleware.tsimport { Injectable, NestMiddleware } from '@nestjs/common';
import { InjectModel } from '@nestjs/mongoose';
import { NextFunction, Request, Response } from 'express';
import { Model } from 'mongoose';
import passport from 'passport';
import { dbConnectionName } from '@/common/constants';
import { SESSION_MODEL_TOKEN, SessionDocument } from '@/common/models/cas/session.schema';
import { CryptUtility } from '@/core/utils/crypt.utility';
export class LineSessionStateCallbackMiddleware implements NestMiddleware {
constructor(
@InjectModel(SESSION_MODEL_TOKEN, dbConnectionName.AUTH)
private readonly sessionModel: Model<SessionDocument>
) {}
async use(req: Request, res: Response, next: NextFunction) {
const state = req.query.state as { [key: string]: any } | undefined;
const session = await this.sessionModel.findOne({
'session.lineState': state
});
if (session && session.session.lineState) {
req.session['oauth2:access.line.me'] = {
state: session.session.lineState
};
}
next();
}
} -
將兩個 middleware 分別對應到
/line及/line/callback上cas.module.ts// ...
@Module({
imports: [
// ...
],
providers: [
// ...
],
exports: [AuthService, UserService],
controllers: [AuthController, UserController]
})
export class CasModule implements NestModule {
configure(consumer: MiddlewareConsumer) {
consumer.apply(AddCustomLineSessionStateMiddleware).exclude({ path: 'cas/auth/line/callback', method: RequestMethod.GET }).forRoutes('cas/auth/line');
consumer.apply(LineSessionStateCallbackMiddleware).forRoutes('cas/auth/line/callback');
}
}
在 session 存入夾帶的 query params
除了 state 的問題外, 在 Line 驗證成功並返回後, Line 並沒有將原本網址所夾帶的參數一併�回傳回來, 例如我從登入頁點下登入的按鈕, 這個按鈕的 url 可能是 /cas/auth/line?redirectUrl=https://app.some.com&test=123, 當從 Line 登入成功並返回 [GET] /line/callback 卻會沒有原本的資料, 所以我們在 [GET] /line 的 middleware 以及 LineStrategy 的 validate 中, 將原本的 query params 存入 session 中, 並在驗證成功後從 session 中取出來
@Injectable()
export class AddCustomLineSessionStateMiddleware implements NestMiddleware {
  constructor(private readonly cryptUtility: CryptUtility) {}

  async use(req: Request, res: Response, next: NextFunction) {
    let state = req.query.state as string | { [key: string]: any };
    if (state) {
      try {
        if (typeof state === 'string') {
          state = JSON.parse(decodeURIComponent(state));
          if (typeof state === 'object' && 'params' in state) {
            // save query params to session, bcs line redirect will only return code and state
            req.session.params = state;
          }
        }
      } catch (error) {
        console.error('Error parsing line query state: ', error);
      }
    }

    // set custom state to replace default state authentication
    req.session.lineState = await this.cryptUtility.randomString();
    passport.authenticate('line', {
      scope: ['openid', 'profile', 'email'],
      state: req.session.lineState // change to custom state
    })(req, res, next);

    next();
  }
}
// ...
@Injectable()
export class LineStrategy extends PassportStrategy(Strategy, 'line', 6) {
  // ...
  async validate(req: ExpressRequest, _accessToken: string, _refreshToken: string, params: any, profile: any, done: (err: any, user: any, info?: any) => void): Promise<any> {
    const state = req.query.state;

    // get original query params from session if exists
    const session: SessionDocument = await this.sessionModel.findOne(
      {
        'session.lineState': state
      },
      { 'session.params': 1 }
    );
    if (session.session.params) {
      req.query.sessionParams = JSON.stringify(session.session.params);
    }

    const { id } = profile;
    const _raw: LineRaw = profile._raw;
    // ...
    done(null, user);
  }
}
設定 Controller
// ...
@Controller('auth')
export class AuthController {
  constructor() // ...
  {}
  // ...

  @UseGuards(LineOauthGuard)
  @Get('line')
  lineSign() {}

  @UseGuards(LineOauthGuard)
  @Get('line/callback')
  async lineAuthCallback(@Request() req: ExpressRequest, @Response({ passthrough: true }) res: ExpressResponse) {
    const url = await this.parseUtility.parseStateFromThirdPartyOauth(req.query.sessionParams as string);
    // ...
    url.search = new URLSearchParams([...Array.from(url.searchParams.entries()), ['st', req.session.uniqueId.toString()]]).toString();

    res.redirect(`${url}`);
  }
}
在 parseUtility.parseStateFromThirdPartyOauth 所傳遞的 req.query.sessionParams 就是我們上面先儲存在 session 中並在驗證成功後取出的 query params
最後將 Strategy 加入 Module
// ...
@Module({
  imports: [
    // ...
    PassportModule.register({ session: true })
  ],
  providers: [
    // ...
    FacebookStrategy,
    GoogleStrategy,
    LineStrategy,
    SessionSerializer
  ],
  exports: [AuthService, UserService],
  controllers: [AuthController, UserController]
})
export class CasModule implements NestModule {
  configure(consumer: MiddlewareConsumer) {
    consumer.apply(AddCustomLineSessionStateMiddleware).exclude({ path: 'cas/auth/line/callback', method: RequestMethod.GET }).forRoutes('cas/auth/line');
    consumer.apply(LineSessionStateCallbackMiddleware).forRoutes('cas/auth/line/callback');
  }
}
其餘皆與 passport-google 相同